- Equipment and Materials
- Equipment
- INSTI Test diagnostic test kit
- Materials
- Gloves
- Disposable absorbent material (e.g. gauze, cotton ball, or bandage)
- Prior to Performing Test
- Prescriber shall place order in IBHIS prior to Authorized Personnel performing the test for clients less than 12 years of age. For all other clients, Authorized Personnel shall offer HIV Point-of-Care testing in accordance to DMH HIV Point-of-Care Test Standing Order Policy 355.09.
- Authorized personnel review order in IBHIS
- Authorized personnel shall ask client to state or provide at least two unique identifiers. Unique identifiers can be any combination of the following:
- Last Name, First Name
- Date of Birth (DOB)
- IBHIS number
- Last 4 digits of Social Security Number (SSN)
- Address
- Phone Number
- Authorized Personnel shall follow universal precautions
- Authorized Personnel shall explain procedure to the client and provide the necessary supplies, including a label with their full name and IBHIS number on the INSTI HIV diagnostic test kit.
- Specimen Collection
- Instruct client to wash hands thoroughly in warm soapy water or use alcohol pad to clean fingertip. Allow their hands to dry completely
- With gloves on, milk client’s fingers towards the tip while observing which finger is optimal – look for the one that has the deepest color for the ultimate blood flow
- Hold the finger correctly as you use the lancet
- Angle the capillary tube downwards when collecting the blood sample so capillary action will be assisted by gravity; 50 uL of blood is needed for adequate sample
- Twist and pull the yellow tip out of the lancet
- Place the lancet on the fingertip slightly off center, press firmly until you hear a click to puncture the skin
- Squeeze the finger to create a bead of blood
- Place the pipette tip horizontally or below horizontal into the blood bead. DO NOT SQUEEZE the pipette bulb; pulse the finger to keep a bead of blood forming.
- To fill the pipette, capillary action will automatically draw the blood to the black fill line.
- Be sure to not cover the air hole between the black line with your fingers.
- Provide client with absorbent material and instruct client to apply pressure on sample site following collection to stop the bleeding.
- Test Procedure
- When the pipette is filled, transfer the specimen (blood) into bottle 1, sample diluent, by squeezing the pipette bulb. If it does not release, cover the air hole on the black line with your fingers and squeeze again.
- Recap bottle 1 and invert a few times and immediately pour bottle 1 with specimen into the center of the membrane unit. Allow to absorb completely, then immediately proceed to the next step.
- Invert bottle 2, color developer, a few times before pouring into the membrane unit. Allow to absorb completely, then immediately proceed to next step.
- Pour bottle 3, clarifying solution, into the membrane unit. Allow to absorb completely then interpret the results.
- Result Interpretation
- Results develop in 60 seconds
- Results must be interpreted within 5 minutes
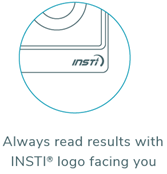
- Always read results with INSTI logo facing you (Figure 1)
Figure 1
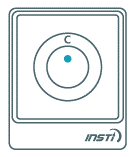
 - Non-reactive result:
- Only one blue control dot appears on the top (Figure 2).
- A non-reactive test result means that HIV antibodies were not detected in the specimen. The test result is interpreted as NEGATIVE for HIV antibodies. However, this does not exclude possible infection with HIV.
Figure 2. Non-reactive Result. One blue control dot.
 - Reactive result:
- Two blue dots appear. One control and one test dot. One dot may be darker than the other. (Figure 3)
- A reactive test result means that HIV antibodies have been detected in the specimen. The test result is interpreted as Preliminary POSITIVE for HIV antibodies. All clients with reactive test result should be re-tested with an HIV confirmatory assay before final HIV antibody status can be determined.
Figure 3. Reactive Result. Two blue dots.
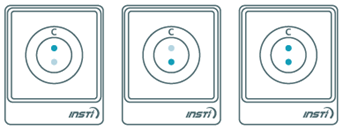
- Invalid result:
- No control dot is an invalid result (Figure 4)
- An invalid test result means that the test was run incorrectly or insufficient specimen was added. Repeat the test once with a new sample collection and INSTI test kit
Figure 4. Invalid Result. No control dot.

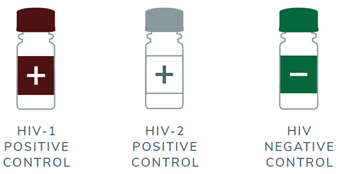
- Quality Control
- Positive and Negative Controls are to be tested individually with INSTI HIV-1/HIV-2 Antibody Test (Figure 5)
Figure 5. HIV-1 and HIV-2 Controls
 - Take the pipette and lightly depress the top bulb.
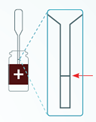
- Insert pipette tip into the clear liquid in the control bottle. Slowly release the top bulb to fill the pipette stem to the black line. (Figure 6)
Figure 6. Fill pipette stem to black line.
 - Transfer the liquid to bottle 1 by completely squeezing the bulb.
 - Recap and invert several times.
- Follow the test procedure above for all controls. Test each positive and negative controls individually with separate INSTI HIV-1/HIV-2 membrane unit.
- Use a new pipette for each Control sample collection.
- Interpret results in the same manner as stated above.
- Documentation:
- Authorized Personnel shall document result in IBHIS as point-of-care HIV test result.
| |
|