- Materials and Equipment:
- Gloves
- SARS-CoV-2 Test Cassette
- SARS-CoV-2 Buffer
- Transfer Pipette
- Sterile Swabs
- SARS-CoV-2 High Positive Control Swab
- SARS-CoV-2 Low Positive Control Swab
- SARS-CoV-2 Negative Control Swab
- Accula™ Dock or Silaris™ Dock
- Accula™ SARS-Cov-2 Control Kit
- Perform Test
- Ensure all clinical samples are at room temperature before beginning assay.
- The provider shall place an order in the Integrated Behavioral Health Information System (IBHIS) prior to the authorized personnel performing the test.
- Authorized personnel shall:
- Review the order in IBHIS.
- Ask client to state or provide at least two (2) unique identifiers. Unique identifiers can be any combination of the following:
- Last Name, First Name
- Date of Birth (DOB)
- Last 4 digits of Social Security Number (SSN)
- IBHIS number
- Phone number
- Address
- Obtain the following information from client and document in IBHIS:
- Preferred method of notification of test results
- Current COVID-19 symptoms, if any
- Please also document if client reports no COVID-19 symptoms.
- Follow universal precautions
- Explain the procedures to the client and provide necessary supplies (if self-collect specimens), including labels with the client’s full name, test date, and IBHIS number on the swab and buffer vial.
- Wash hands and put on gloves.
- Check for kit expiration date.
- Obtain the nasal swap specimen from the client:
- Tilt client’s head back 70 degrees.
- While gently rotating the mid-turbinate swab, insert swab into the nostril until resistance is met at turbinates.
- Rotate the swab several times against the nasal wall.
- Use the same swab and repeat the sampling procedure in the other nostril.
- Specimen swabs must be eluted in Accula™ buffer immediately after sample collection.Eluted samples in Accula™ buffer may be kept at room temperature for up to 2 hours or refrigerated at 2°C to 8°C and tested within 24 hours from the time of elution.
- Eluted samples in Accula™ buffer many be stored for up to 1 week at -20°C (longer storage at -80°C or colder).
- Insert nasal swab specimen into the SARS-CoV-2 buffer and rotate 5 times rubbing it against the wall of the vial
- Remove the client’s swab from SARS-CoV-2 buffer vial and discard it into a biohazardous waste container.
- Replace the cap on the SARS-CoV-2 buffer vial.
- Dock Usage
- Place dock on a flat surface
- Connect the AC Adapter to the power cord
- Open the dock by depressing the black button located on the top left
- Verify that the Dock screen displays: “DOCK IS READY INSERT CASSETTE”
- Remove a test cassette and transfer pipette from the foil package.
- Label client’s ID and testing date on the test cassette.
- Insert the test cassette into the DOCK, leaving the lid open.
- Press the test cassette down firmly to seat it in the DOCK.
- Verify that the DOCK screen displays: “SARS-CoV-2 CASS. INSERTED” then, “ADD SAMPLE THEN CLOSE LID”
- Invert SARS-CoV-2 buffer vial to mix then remove the cap from the eluted client sample in the SARS-CoV-2 buffer.
- Pipette Usage
- Firmly squeeze the TOP bulb of the pipette. While continuing to squeeze the top bulb firmly, place the pipette tip well below the surface of the liquid in the SARS-CoV-2 buffer vial.
- Slowly release the top bulb to completely fill the pipette stem with sample. Some liquid may overflow.
- Completely remove the foil tab covering the sample port on the test cassette. Discard the foil tab. Once the foil tab is removed from the sample port, sample must be added immediately within 5 minutes.
- Insert pipette tip all the way into the sample port on the test cassette until resistance is met.
- Squeeze the TOP bulb of the pipette firmly to dispense all the sample from pipette stem into the test cassette. A small of sample may remain in the overflow chamber and this is normal.
- Dispose the pipette in a biohazardous waste container.
- The DOCK screen will then read: “Close the lid of the Dock immediately to automatically begin the test program”
- Once the lid is closed, verify that the DOCK screen displays, “SAMPLE LOADED, LID CLOSED”
- Verify the DOCK screen displays: “CASSETTE SEALED TEST STARTED”Verify the DOCK screen displays: “TEST RUNNING REMANING XX:XX.” Test takes approximately 30 minutes to complete.
- DOCK will beep at the end of test processing.
- Verify the DOCK screen displays: “TEST COMPLETE READ RESULTS”
- Open the lid of the DOCK and remove the test cassette to interpret the results.
- Interpretation of Results
- Results should be interpreted within 1 hour of test completion
- Limitations:
- Improper collection, storage, or transport of specimens may lead to false negative or invalid result.
- Negative results do not rule out SARS-CoV-2 infections and should not be used as the sole basis for patient management decisions.
- False negative results may occur if viruses are present at levels below the test limit of detection.
- False negative results may occur if mutations are present in the region targeted by the test.
- Cross-reactivity respiratory tract organisms other than those listed in the Analytical Specific Study may lead to erroneous results.
- Negative result:
- The absence of any shade of Blue Test Line at the “T” position indicates a negative result for the presence of SARS-CoV-2 as shown in Figure 1.
- The presence of a blue process control line at the “C” position as shown in Figure 1.
- The absence of a negative process control line NC position as shown in Figure 1.
- Figure 1:
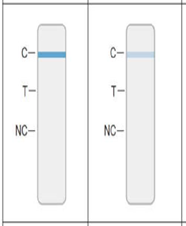 Negative test for SARS-CoV-2 Negative test for SARS-CoV-2-
The absence of ANY shade of a BLUE Test Line at the T position indicates a negative result for the presence of SARS-C0V-2
AND the presence of a blue process control line at the C position
AND the absence of a negative process control line NC position - Positive result:
- The appearance of any shade of Blue Test Line at the “T” position indicates the presence for SARS-CoV-2 as shown in Figure 2.
- With or without the appearance of a blue process control line at the C position as show in Figure
- Figure 2:
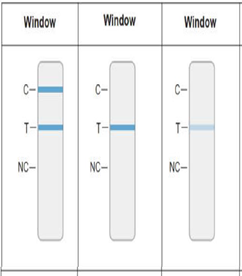 Positive test for SARS-CoV-2 Positive test for SARS-CoV-2- The appearance of ANY shade of a Blue Test Line at the T position indicates a positive result for the presence of SARS-CoV-2
WITH or WITHOUT the appearance of a blue process control line at the C position
AND the absence of a negative process control line NC position
- Invalid result:
- The appearance of any shade of a negative process control line at the “NC” position as shown in Figure
- The appearance of ALL lines or NO lines at “C”, “T”, and “NC” indicates an invalid test as shown in Figure 3.
- Figure 3:
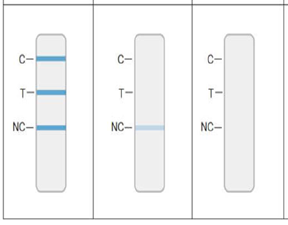 Invalid Results Invalid Results- The appearance of any ANY process control line at the NC position indicates an invalid test
The appearance of ALL or NO line at the C, T, and NC position indicates an invalid test - Quality Control
- Each Accula™ SARS-CoV-2 test cassette contains two internal process controls:
- An internal positive process control labeled “C” and a negative control labeled, “NC”
- Positive process control is to verify assay steps were executed properly
- Negative control is for false positive results due to non-specific binding
- Documentation
- Authorized personnel who perform and interpret test results shall document point-of-care SARS-CoV-2 test results in the IBHIS.
- Report Test Results
- Authorized personnel shall report positive test results to the Department of Public Health (DPH) via www.SimpleReport.gov. Negative test results are not required to be reported to DPH.
- Reporting positive test results via SimpleReport:
- Log in to SimpleReport.
- Select DMH site / clinic.
- Click on Conduct Tests tab.
- Enter name of client.
- Select correct client based on full name and date of birth.
- If client not yet added to the system, click Patients tab, +add patient, and enter client’s information before saving changes.
- Click Begin Test.
- Complete Patient Questionnaire, which includes:
- Method client would like to be notified of test results.
- Symptoms client reported at time of test.
- Select testing device and swab type from dropdown menus.
- Select result of COVID-19 test.
- Click submit once all questions have been completed.
| |
|